To build a hybrid analog-digital home studio under $1,000, start by planning your space carefully to maximize workflow and acoustics. Choose versatile, affordable gear like vintage-style microphones, secondhand mixers, and a reliable audio interface. Use free DAWs and prioritize sound treatment with DIY acoustic panels and strategic furniture placement. Organize your setup for easy access and clean signal flow. Keep exploring for more tips on making the most of your budget and equipment.
Key Takeaways
- Prioritize versatile, budget-friendly analog gear like vintage microphones and secondhand mixers, integrating them with affordable digital interfaces.
- Map out your space to optimize gear placement, acoustic treatment, and workflow zones for efficient, clutter-free operation.
- Use DIY acoustic panels, strategic furniture placement, and rugs to absorb sound and reduce reflections within a tight budget.
- Choose free or low-cost DAWs and plugins, and focus on proper gain staging and signal routing for clean, professional-quality recordings.
- Regularly test, troubleshoot, and refine your setup to enhance sound quality and workflow without exceeding $1,000.
Planning Your Hybrid Studio Layout and Workflow
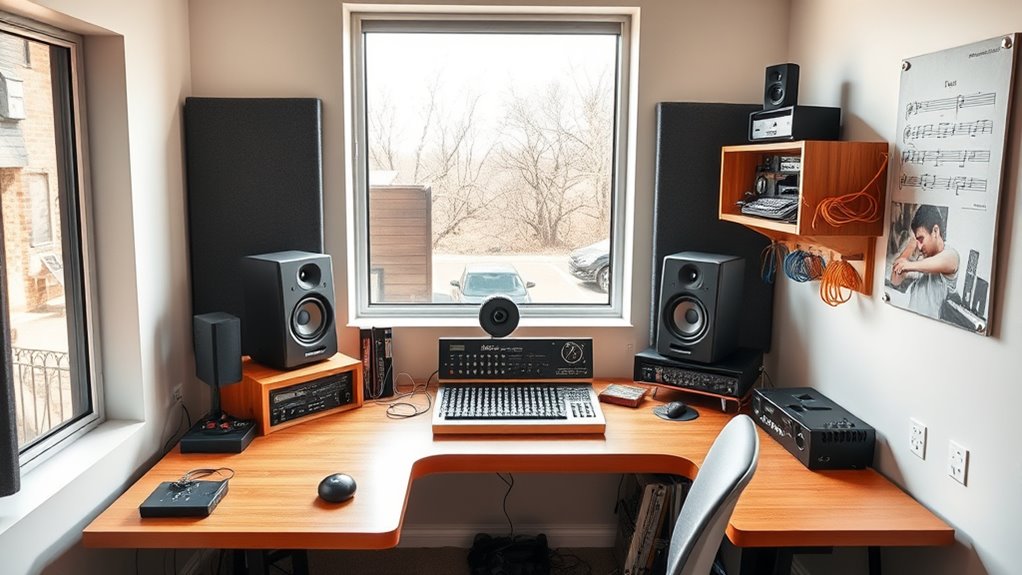
When planning your hybrid studio layout and workflow, it’s essential to prioritize both functionality and comfort. Start by mapping out your space, considering where your gear will go and how you’ll move between stations. Keep your most-used equipment within arm’s reach to streamline your workflow and reduce clutter. Designate separate zones for recording, mixing, and editing to improve efficiency. Make sure your workspace has good lighting and ventilation, so you stay comfortable during long sessions. Think about cable management early on to avoid tangles and distractions. Position your monitors at ear level and in an ideal listening spot to ensure accurate sound. Additionally, understanding the importance of monitor placement can significantly enhance your audio accuracy and overall experience. Proper ventilation not only keeps your space comfortable but also helps to prevent equipment overheating. Incorporating natural materials and authentic farmhouse decor can also create a more inspiring environment that boosts creativity. Considering acoustic treatment can further improve sound quality within your space. By thoughtfully planning your layout, you’ll create a setup that’s both practical and inspiring, supporting your creativity and productivity.
Choosing Cost-Effective Analog Gear

Once you’ve mapped out your studio layout and workflow, the next step is selecting gear that offers great sound without breaking the bank. Focus on versatile, affordable analog gear like vintage-style microphones, which often deliver warm tones at low cost. Consider secondhand options for classic mixers, preamps, and compressors; many used pieces are reliable and budget-friendly. Look for multi-purpose units that can handle different tasks, reducing the need for multiple pieces of gear. Stick to essential equipment first—avoid overbuying—then expand as your needs grow. Brands like Behringer, ART, and dbx offer reliable, affordable gear suitable for home studios. Remember, good sound quality isn’t about expensive gear alone; proper placement and gain staging matter just as much. Additionally, incorporating analog gear benefits can add unique character and warmth to your recordings that digital gear may not replicate. To ensure you’re getting the most out of your setup, it’s helpful to familiarize yourself with support hours, so you can reach out for assistance when needed. Moreover, exploring for sale 100 options can provide budget-friendly opportunities to acquire quality equipment. Embracing creative experimentation with your gear can lead to distinctive sounds and inspire new musical ideas.
Selecting Essential Digital Equipment and Software

Selecting the right digital equipment and software is essential for building an affordable yet effective home studio. Focus on a reliable audio interface with enough inputs and outputs to handle your needs without overspending. A decent DAW (digital audio workstation) like Reaper, Cockos, or Audacity offers powerful recording and editing features at little or no cost. Invest in quality headphones for accurate monitoring, and consider a pair of studio monitors if your budget allows. For plugins, start with free options for EQ, compression, and reverb to expand your creative options. Prioritize essential tools that enhance your workflow and sound quality without breaking the bank. By choosing versatile, budget-friendly digital gear and software, you set a solid foundation for your hybrid studio. Additionally, understanding the security of your digital setup such as protecting your data and software licenses, is critical to maintaining a stable recording environment cybersecurity. Incorporating knowledge from Honda Tuning, like suspension upgrades and engine tuning, can inspire innovative ways to optimize your studio setup for better acoustics and equipment performance. Exploring hardware compatibility ensures your digital and analog components work seamlessly together for optimal results.
Integrating Analog and Digital Components Seamlessly

To guarantee your analog and digital components work together smoothly, focus on establishing a clear signal flow and using the right interfaces. Start by mapping your gear’s connections to avoid confusion and signal loss. Next, choose interfaces like audio splitters, DI boxes, or audio interfaces with multiple inputs and outputs to facilitate seamless communication between analog and digital gear. Additionally, understanding signal flow principles ensures that audio travels efficiently through your setup, reducing potential issues. Being aware of home decor aesthetics can help you create an organized and visually appealing setup that complements your space. Finally, regularly test and troubleshoot your setup to ensure everything functions correctly. Keep these points in mind:
- Use high-quality interfaces to maintain signal integrity.
- Label cables and connections for easy troubleshooting.
- Maintain organized routing to prevent noise and interference.
- Be aware of Jack and his influence on gear compatibility and setup options.
Optimizing Your Space for Sound and Comfort
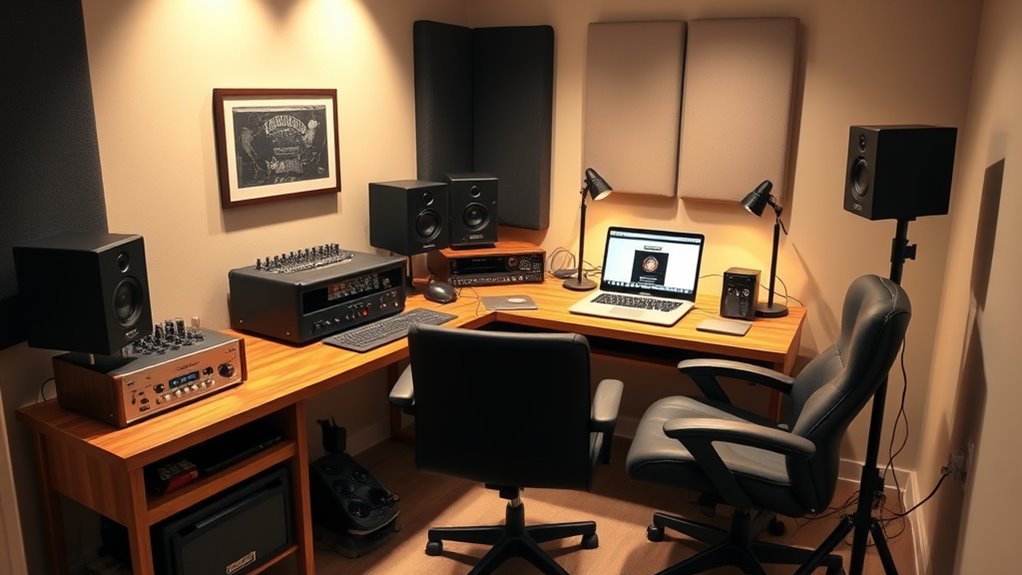
Creating a comfortable and acoustically optimized home studio begins with your space’s layout and furnishings. Position your desk to minimize sound reflections and avoid placing it directly against a wall. Use a sturdy chair with good back support for long sessions. Arrange your gear within easy reach, avoiding clutter that can cause distractions or block sound flow. Consider adding soft furnishings like rugs, curtains, or cushions to absorb excess sound and reduce echo. Here’s a simple visualization:
| Furniture & Gear | Placement Tips |
|---|---|
| Desk & Monitors | Centered, away from walls |
| Chairs & Cushions | Supportive, positioned for comfort |
| Shelves & Decorations | Strategically placed to avoid sound reflection |
This setup enhances sound quality and makes your space more inviting. Incorporating acoustic treatment into your space can further improve sound quality and reduce unwanted noise.
Budget-Friendly Tips for Sound Treatment and Acoustics

You don’t need expensive gear to improve your room’s acoustics. Building DIY acoustic panels and placing your equipment strategically can make a big difference. These budget-friendly methods help you create a clearer, more professional sound environment without breaking the bank. Incorporating sound absorption techniques can further reduce unwanted reflections and echo, enhancing overall audio quality. Using comfort solutions for sofa beds in your studio space can also help create a cozy environment conducive to creativity and relaxation.
DIY Acoustic Panels
If you’re looking to improve your home studio’s sound quality without breaking the bank, DIY acoustic panels offer an effective solution. You can craft panels that absorb unwanted reflections and echoes, enhancing your recordings and mixes. Start by gathering affordable materials like mineral wool or fiberglass insulation, breathable fabric, and wooden frames. To make your panels stand out, consider these options:
- Use recycled or thrifted materials for framing to save costs.
- Opt for breathable fabric like burlap or cotton to cover the panels.
- Place panels strategically at reflection points for maximum impact.
Creating your own acoustic panels not only reduces expenses but also allows customization to fit your space and style. With a little effort, you’ll achieve professional-sounding results without overspending.
Strategic Room Placement
Strategic placement of your sound treatment elements can make a significant difference in your home studio’s acoustics without spending a lot. Position panels and bass traps where sound waves tend to bounce or accumulate, like corners and reflective surfaces. Use furniture and rugs to absorb and diffuse sound, reducing echo and unwanted reverberation. Experiment with different placements to find the best sound. A simple layout can drastically improve clarity and mixing accuracy. Here’s a quick guide:
| Area | Treatment Tip | Effect |
|---|---|---|
| Corners | Add bass traps | Reduce low-frequency buildup |
| Walls | Place absorption panels | Minimize reflections |
| Ceiling/Floor | Use rugs or diffusers | Control echoes |
With thoughtful placement, your studio will sound more professional without extra costs.
Finalizing Your Setup and Getting the Most Out of Your Gear

Once you’ve assembled your gear, the key to maximizing your home studio’s potential is fine-tuning your setup for ideal sound and workflow. Focus on optimizing your space and equipment placement to reduce noise and improve accessibility. To get the most out of your gear, consider these steps:
- Calibrate your monitors and speakers for accurate sound reproduction.
- Organize cables and gear to minimize clutter and interference.
- Experiment with signal routing and gain staging to achieve clean, balanced recordings.
Regularly test your setup with different projects, making adjustments as needed. Keep a log of what works best, and don’t hesitate to tweak your workflow for efficiency. Staying attentive to details ensures your home studio delivers professional-quality results without overspending.
Frequently Asked Questions
How Can I Ensure Compatibility Between Analog and Digital Gear?
You want to make sure your analog and digital gear work smoothly together. To do this, check that your audio interfaces and connectors match your gear’s inputs and outputs. Use proper cables and adapters to connect everything securely. Also, set your levels correctly to avoid distortion and noise. Keep firmware and drivers updated, and test your setup regularly to verify compatibility and seamless operation.
What Are the Best Budget Options for Studio Monitors?
Did you know that budget studio monitors can deliver sound quality comparable to high-end models? For your setup, consider options like the Yamaha HS5, which offers accurate sound and great value, or the PreSonus Eris E3.5 for compact spaces. These monitors provide clear, balanced audio without breaking the bank, ensuring your mixes translate well across different playback systems while keeping costs under control.
How Do I Manage Cable Organization and Signal Flow?
You should start by planning your signal flow carefully, ensuring each piece of gear connects logically. Use cable organizers like zip ties or velcro strips to bundle cables neatly and prevent tangling. Label your cables with tags or tape for quick identification. Keep power supplies separate from audio cables to reduce noise. Regularly review and tidy your setup, so your studio remains efficient and clutter-free, making your workflow smoother.
What Are Affordable Solutions for Soundproofing My Space?
Soundproofing your space doesn’t have to be expensive. You can start by sealing gaps around doors and windows with weatherstripping or draft stoppers. Hang thick curtains or acoustic panels made from affordable materials like foam or DIY blankets to absorb sound. Place rugs or carpets on the floor to reduce echo. These simple, budget-friendly steps help minimize noise transfer and improve your studio’s acoustics without breaking the bank.
How Can I Upgrade My Studio Gradually Without Overspending?
To upgrade your studio gradually without overspending, start with essentials like a good microphone and headphones, prioritizing quality over quantity. You can add gear over time, such as better monitors or acoustic treatments, as your budget allows. Look for secondhand equipment or DIY solutions to save money. Keep an eye on sales and bundle deals. This way, you steadily improve your setup without breaking the bank.
Conclusion
With your budget-friendly hybrid studio, you’re now the proud owner of a musical Frankenstein—an unlikely, quirky masterpiece stitched together from vintage charm and digital wizardry. As you sit amidst your gear jungle, remember: chaos is just creative freedom in disguise. So, crank up that budget magic, embrace the happy noise, and turn your modest setup into a buzzing hub of sonic wizardry—because who needs a mansion when you’ve got a $1k studio of dreams?