

To keep your retro band patches with pristine stitching, start by choosing authentic, high-quality patches with tight, even stitches and sturdy fabric. Handle them with clean hands or cotton gloves, and store them flat in acid-free containers away from sunlight and humidity. Regularly clean gently and repair any damage quickly using proper techniques. For more ideas on maintaining your collection’s value and appearance, continue exploring expert tips and methods.
Key Takeaways
- Choose authentic patches with tight, even stitching and vibrant colors for lasting quality.
- Handle patches with clean hands or cotton gloves to prevent oils and dirt transfer.
- Store in acid-free, flat containers away from sunlight and humidity to preserve stitching integrity.
- Clean gently using a soft brush or damp cloth, avoiding harsh scrubbing to protect embroidered details.
- Regularly inspect and repair minor tears promptly with matching thread to maintain pristine condition.

PACMAXI Flip Page Patch Book Patch Organizer Storage Zippered Clear Handbag with Removable Metal Ring Binders Contain 6 Flip-Page for Patch Collector (Black)
Material: PACMAXI patches display book adopts high-quality polyester fabric, Product Size: 12.6 x 9.84×1.18 inches,which has the advantages…
As an affiliate, we earn on qualifying purchases.
As an affiliate, we earn on qualifying purchases.
Choosing Authentic and High-Quality Patches

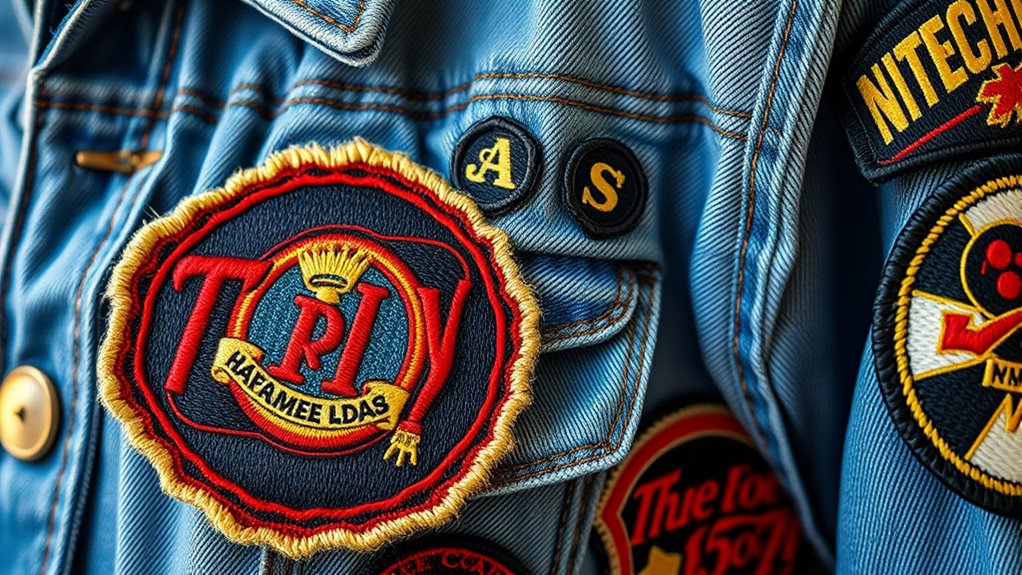
When selecting retro band patches, it’s essential to focus on authenticity and quality to guarantee you get a genuine, durable product. Start by examining the stitching—tight, even stitches indicate good craftsmanship. Check the fabric; high-quality patches often use sturdy materials that won’t easily fray or fade. Look for clear, vibrant colors and sharp design details, which show the patch was produced with care. Authentic patches usually feature official logos or trademarks, so verify the source or seller’s reputation. Avoid cheap, mass-produced copies that feel flimsy or have blurry images. Investing in well-made patches assures they will last through countless wears and washes, keeping your collection pristine over time. Additionally, understanding color accuracy helps ensure the patch maintains its original appearance over time. Recognizing production techniques can also give insight into the patch’s authenticity and craftsmanship. As the security of AI systems advances, ensuring the integrity of your collection against counterfeit patches becomes increasingly important. Prioritize quality to enjoy your retro band patches for years to come.

Patch Display Case Wall Mount — Black Wooden Patch Display Board for Velcro Patch , Military Patch Display & Police Patch Display, 1.16 x 12 x 1.7 in
Secure Velcro Hold:Plush furry fabric backing grips hook-backed patches for a reliable velcro patch display. Perfect as a…
As an affiliate, we earn on qualifying purchases.
As an affiliate, we earn on qualifying purchases.
Proper Handling and Storage Techniques

When you handle your patches, make sure your hands are clean to prevent oils and dirt from causing damage. Store them in acid-free materials to preserve their colors and integrity over time. Proper handling and storage can keep your retro patches looking great for years to come. Additionally, using proper storage techniques can further enhance their longevity and appearance. Regularly inspecting your patches and keeping them in a climate-controlled environment can also help prevent deterioration caused by humidity or temperature fluctuations. Incorporating gentle cleaning methods can help maintain their vibrancy without risking damage or fading.
Handle With Clean Hands
Handling your retro band patches with clean hands is essential to keep them looking their best. Oils, dirt, and sweat from your skin can transfer onto the fabric and stitching, causing discoloration or deterioration over time. Before touching your patches, wash your hands thoroughly with soap and water, and dry them completely. This simple step minimizes the risk of damaging delicate threads or fading vibrant colors. Avoid touching the patches unnecessarily, especially if they’re not yet mounted or stored properly. If you need to handle them frequently, consider wearing cotton gloves to prevent oils from transferring. Proper handling preserves the patches’ integrity and ensures they stay in pristine condition for years to come. Regular cleaning and maintenance of your collection also help prevent buildup of dirt and oils. Always treat your collection with care and cleanliness.
Store in Acid-Free Materials
To guarantee your retro band patches stay in excellent condition over time, storing them in acid-free materials is essential. Acid-free storage prevents deterioration caused by acidic residues that can weaken fabric and cause fading or discoloration. Use archival-quality sleeves, envelopes, or storage boxes made specifically for collectibles. Place each patch flat to maintain its shape and avoid folding or creasing. You can also consider preventing damage by controlling environmental factors such as humidity and temperature. Keep the storage environment cool, dry, and away from direct sunlight to prevent damage. Label your containers for easy identification without unnecessary handling. Regularly inspect your patches for signs of deterioration and replace storage materials if they show signs of aging. Proper handling and storage techniques in acid-free materials, along with maintaining a stable environment, help preserve the vibrant colors and pristine condition of your patches. Additionally, understanding firearm sales regulations can be beneficial if your patches feature related themes, ensuring your collection remains compliant with industry standards.

LEMEPINZ Nature is Magic 3 Inches Embroidery Patch, Floral Iron On/Sew On Travel Embroidered Applique Patch, Travel Patches, Fabric Patches for Clothes Backpacks Hats, Adventure DIY Accessories Gifts
Beautiful Design: Our LEMEPINZ premium embroidered patch, delicate patch features a stunning and trendy design that's perfect for…
As an affiliate, we earn on qualifying purchases.
As an affiliate, we earn on qualifying purchases.
Cleaning and Maintaining Embroidered Details

To keep your patches looking their best, you need to use gentle cleaning techniques that won’t damage the embroidery. Proper storage methods also help prevent deterioration over time, preserving the details. If you notice any damage, repairing the embroidery quickly can save your patches from further harm. Incorporating proper home decoration ideas can also enhance the display and protection of your patches, ensuring they remain pristine. Additionally, understanding the importance of privacy and boundaries in relationships can help maintain a balanced environment for your collection and personal space. Considering maintenance tips for embroidered patches, such as avoiding harsh chemicals, can further extend their lifespan and keep them looking new. Being aware of cookie management and privacy policies can help you better understand how your browsing preferences are protected when researching collection care online.
Gentle Cleaning Techniques
When it comes to cleaning embroidered details on your retro band patches, gentle techniques are essential to preserve their intricate stitching and vibrant colors. Harsh scrubbing or strong cleaning agents can easily damage the embroidery, so it’s best to approach the cleaning process with care.
Here are some tips to keep your patches in top condition:
- Use a soft-bristled brush or cotton swab to gently remove surface dust.
- Prepare a mild cleaning solution with lukewarm water and a small amount of gentle detergent.
- Dab the embroidery softly with a clean cloth or sponge, avoiding excessive moisture.
- Rinse with a damp cloth, then pat dry with a soft towel to prevent water damage.
Always handle your patches delicately to maintain their pristine condition.
Proper Storage Methods
Proper storage methods play a key role in maintaining the embroidered details of your retro band patches. To keep them in pristine condition, store patches flat in acid-free sleeves or archival boxes. Avoid stacking heavy items on top, which can distort embroidery or cause tears. Keep patches away from direct sunlight, as UV rays fade colors and weaken fabric fibers over time. Maintain a stable environment with consistent temperature and humidity to prevent creases, mold, or fabric deterioration. If patches are mounted on backing, ensure they are securely attached to prevent shifting or fraying. Regularly inspect your collection for signs of damage or dust buildup, and gently clean if necessary. Proper storage guarantees your patches stay vibrant and well-preserved for years to come.
Repairing Damaged Embroidery
Damaged embroidery can compromise the appearance and integrity of your patches, but careful cleaning and maintenance can restore their original detail. First, gently brush off surface dirt with a soft toothbrush. Next, spot clean with a mild detergent and cold water, avoiding excessive scrubbing. Here’s how to proceed:
- Use a cotton swab dipped in diluted detergent for stubborn stains.
- Rinse the patch thoroughly with cold water to remove soap residue.
- Pat dry with a clean towel, avoiding twisting or wringing.
- If needed, lightly iron the patch on low heat with a cloth between the iron and embroidery to smooth out wrinkles.
- Regularly proper maintenance enhances the longevity and visual appeal of embroidered patches, ensuring they stay pristine over time.
These steps help preserve embroidery while removing dirt and damage, keeping your patches looking pristine.

48 Pcs Music Style Patches Stickers Music Theme Iron on Patches Tape Radio Guitar Headphone Note Embroidery Vintage Patches Sew on Applique Patches for Clothes Hats Backpack Clothes DIY Accessory
Rich in Styles: you will receive 48 pieces of music sew on patches with many styles and colors,…
As an affiliate, we earn on qualifying purchases.
As an affiliate, we earn on qualifying purchases.
Display Options to Preserve Stitch Integrity

To maintain the stitch integrity of your retro band patches, choosing the right display options is essential. Avoid hanging them directly on metal hooks or pins that can cause tears or stretch the fabric. Instead, opt for a flat display, like a shadow box or framed case, which supports the patch evenly and reduces stress on the stitching. Use acid-free backing materials to prevent deterioration over time. If you prefer hanging, consider using gentle, non-adhesive mounting techniques such as sewn-in clips or padded hangers designed for textiles. Keep patches away from direct sunlight, which can weaken fibers and fade colors. Maintaining a stable environment with controlled humidity and temperature also helps preserve the stitches and fabric, ensuring your patches stay pristine for years to come.
Repairing and Restoring Faded or Damaged Patches
When restoring faded or damaged patches, your goal is to carefully revive the original vibrancy without compromising the integrity of the stitching. Start by evaluating the damage to determine the best repair approach. Then, follow these steps:
- Clean the patch gently with mild soap and water to remove dirt and grime.
- Use fabric-safe dyes or color restoration pens to touch up faded areas carefully.
- For tears or holes, sew with matching thread using small, tight stitches to reinforce the damaged area.
- If necessary, consult a professional textile restorer for complex repairs or delicate patches.
Always test dyes on a hidden area first to avoid further damage. Patience and precision are key to preserving your patch’s vintage appeal.
Keeping Records and Documenting Your Collection

Keeping detailed records of your retro band patches helps you maintain and appreciate your collection over time. Use a notebook, spreadsheet, or dedicated app to log each patch’s details, including band name, concert date, venue, purchase date, and condition. Photograph each patch from multiple angles, especially if it has unique features or damage. Record where and when you acquired each patch, along with its price if applicable. Organizing this information ensures you can track the value, provenance, and authenticity of your collection. Regularly update your records as you add new patches or restore existing ones. Good documentation makes it easier to identify rare pieces, verify authenticity, and enjoy your collection’s history. Clear records also help when selling or exchanging patches with fellow collectors.
Frequently Asked Questions
How Can I Identify Counterfeit Retro Band Patches?
To identify counterfeit retro band patches, examine the stitching closely. Authentic patches have tight, even stitching with no loose threads. Check the colors; genuine patches use vibrant, consistent hues, while fakes often look faded or mismatched. Feel the material—real patches use high-quality fabric. Compare the patch to official images or known authentic examples. If something seems off, trust your instincts and research further before purchasing.
What Are the Best Tools for Patch Embroidery Restoration?
Did you know that a well-restored patch can boost its value by up to 30%? When it comes to patch embroidery restoration, your best tools include fine embroidery needles, high-quality thread that matches the original, and a steady hand for precise stitching. A magnifying glass helps you see tiny details, while embroidery hoops keep your work taut. With these tools, you can restore patches to their pristine condition and preserve their vintage charm.
Are There Specific Detergents Recommended for Patch Cleaning?
When it comes to cleaning patches, you want to use gentle detergents that won’t damage the stitching or fabric. Mild, pH-neutral detergents are your best bet, especially those formulated for delicate textiles. Avoid harsh chemicals, bleach, or strong solvents, as they can cause discoloration or weaken the threads. Always test a small area first and hand wash your patches to maintain their pristine condition and vibrant colors.
How Do I Prevent Stitching From Unraveling Over Time?
You might find that gentle handling helps your patches stay beautifully intact. To prevent stitching from unraveling, avoid excessive pulling or harsh cleaning. Use a soft, damp cloth for cleaning, and if needed, reinforce the stitches with a careful touch or a dab of fabric glue on loose threads. Regularly inspecting your patches and addressing any loose ends early keeps your collection looking pristine and well-preserved over time.
Can High Heat Damage Vintage Patches’ Stitching?
High heat can definitely damage vintage patches’ stitching. When exposed to excessive heat, the threads may weaken, melt, or become brittle, which can lead to unraveling or permanent damage. To keep your patches in pristine condition, avoid ironing directly on them or using high-temperature settings on your iron. Instead, use a low heat or a protective cloth to prevent any harm and preserve their original stitching quality.
Conclusion
By caring for your retro band patches, you protect their history and passion, keeping memories alive. Neglecting them risks losing their vibrant stories, faded like forgotten melodies. With careful handling and documentation, you preserve more than fabric—you safeguard a piece of musical soul. Every stitch holds a story, every patch a moment frozen in time. Cherish your collection, and let its legacy resonate for generations to come.